Windows 11 automatically downloads and updates so you can stay up-to-date with the latest fixes, improvements, and security features. Commonly, updates can have bugs that negatively affect the experience.
It’s impossible to stop Windows 11 entirely, but you can temporarily stop updates. If you’d like to turn off Windows 11 updates forever, you can alter the Policy for automatic updates via Registry or Group Policies.
Windows Services: Stop Windows 11 Auto Update
Windows update service can be disabled to turn off automatic Windows updates. You can find out how below.
- Windows Services will open when you type service.msc (Windows + R) in the Run dialog.
- Windows Update service can be located by scrolling through the services. Open the Windows Update properties by double-clicking on Windows Update.
- Select Disabled under the General Tab by selecting the drop-down option next to the Startup option.
- Once you have made the change, click on Apply. It will then permanently turn off Windows 11 updates.
- Windows Services can be used to re-enable the Windows update service if you need to switch on Windows 11 updates.
Windows 11 Update – Stop with Registry Editor

You can prevent Windows 11 upgrades by using Registry Editor. Please follow these steps to stop Windows 11 updating.
Step 1. To open the Registry Editor, press Win +R and enter regedit.exe.
Step 2: Go to “HKEY_LOCAL_MACHINE\SOFTWARE\Policies\Microsoft\Windows\WindowsUpdate.”
Step 3: Set the “DWORD (32 bit)” value to 1.
If you cannot find the value, click on Windows Update from your right-click menu and select Create > Dword (32-bit) Value. Then, set the value of TargetReleaseVersionInfo to 21H1.
Third-party tools can block the windows 11 Update.
For an easy solution to stopping Windows 11 updates, you can install third-party EaseUS Clean Genius. Using this tool, you can stop Windows 11 automatically updating without wasting time. Use this program and follow the steps below.
Are you looking for a solution that disables Windows automatically updating with just a click of a button? Then, it would help if you got EaseUS CleanGenius, a versatile toolkit. This tool can repair hard drives and disable/enable Windows Update.
To disable Windows Update:
- The first step is to download and install the EaseUS cleanGenius software. You can download EaseUS CleanGenius free of charge and install it onto your computer.
- Click “Optimization” in EaseUS CleanGenius.
- The program will determine the current Status of Windows Update automatically. Windows Update will be disabled if the Windows Update service is already enabled.
- You can check to see if the service has been disabled automatically by going to “Start > Type “Services > Right-click Service and select “Run As Administrator.”
- Right-click on Windows Update and select “Properties”. If you look at the “Service Status” section of the page, the service should have been turned off.
Windows 11: Group policy editor to turn off automatic updates
Windows 11 Pro has a Group Policy Editor that lets you turn off automatic updates.
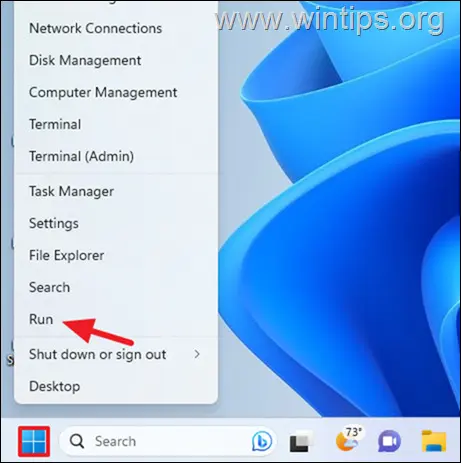
- Run when you click on the Run button by selecting it with your right-click.

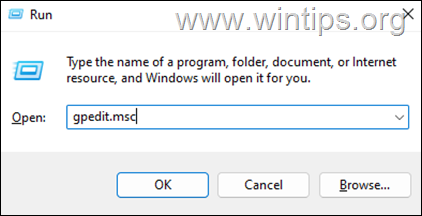
- To open Group Policy Editor, type gpedit. msc in the search box and click OK.

- To access the Editor for Group Policies, click:
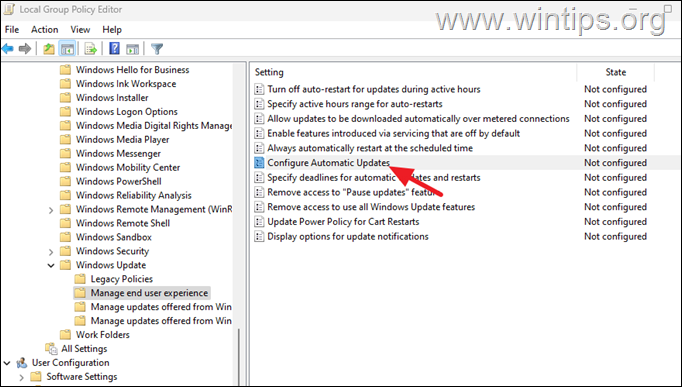
Computer Configuration > Administrative Templates > Windows Components > Windows Update > Manage end-user experience.
- Double-click Configure Automatic Updates policies in the left pane.
- The Disabled option in the policy setting window will turn off the automatic updates. Once selected, click Apply > Okay to save any changes. *

* Notes:
- Windows Update Updates must be downloaded manually if you set the Status of this Policy to “Disabled.”
- To turn on Automatic Updates again, change this setting from Not Configured.
The Conclusion
Windows 11 offers the best features. For me, I always keep my devices current and update them. Windows Updates can sometimes be worthless. You should always know the software you install and download on your PC. Try these above solutions to turn off automatic updates.