The process of making the perfect Placemat is simple, and in this article, I’ll demonstrate various ways to make a placemat so you can personalize the table setting. Placemats shield your tables from marks and stains, in addition to adding an element of color to your dining area. They are great presents they are great for holidays or special events.
WHAT FABRIC IS BEST FOR SEWING A PLACEMAT?
In reality, any fabric could be used to create a placemat. A high-quality quilting fabric can give an array of patterns to pick from. Furthermore, placemats are more durable than cheaper ones.
One of the designs below utilizes upcycled denim jeans! Check out the Denim DIY Placemats. They are either as easy or as complex as you like.
It is easy to patch large pieces, and you could also make use of denim strips with different dimensions. Utilize tweezers to make fraying edges, and you will have a unique placemat!
The project below makes use of corduroy as a back fabric. I’d never heard of it prior to this, but I think it’s a great idea to be a great placemat.
Take a look at the fabric placemat. Below, you can see the Fabric Placemat project. This is a simple project that can be completed within a matter of minutes.
How To Make Your Own Placemats
This diagram will help you accomplish this!
Wash and Dry Fabric
Wash and dry your fabrics in order to allow for shrinkage before sewing. After your fabric has dried, we can move on!
Cut Your Fabric into Equal Sized Rectangles
It’s dependent on you to decide how large you’d like your placemats to be. I went on the internet and searched for placemats available for purchase to determine the standard size. The size is 14” by 20″.
Do not forget that you’ll need to leave one little seam allowance all around. The finished Placemat will always be a little smaller than the one you cut.
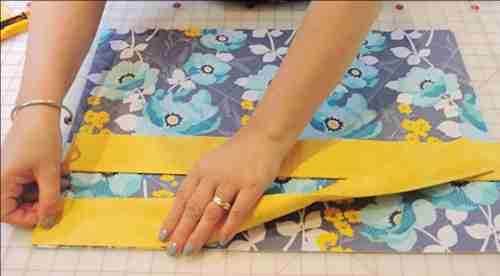
Every Placemat needs two equally rectangular-shaped pieces of material.
Because I was working with plaid fabrics, I simply cut in the pattern’s lines. The pattern, making sure to maintain clean, uniform cuts. It was easy!
Line up Fabric Pieces
Make two rectangles, then place them on top of one another With the pattern facing up.
Sew the Pieces together, but leave an opening
You will now stitch your pieces in a circular fashion. You should use a shorter seam allowance. You don’t wish to make your Placemat any smaller than the one you cut.
Make a tiny opening to one side. This way, it is possible to flip the mat to the right.
Flip the Placemat Left side up and Sew to close.
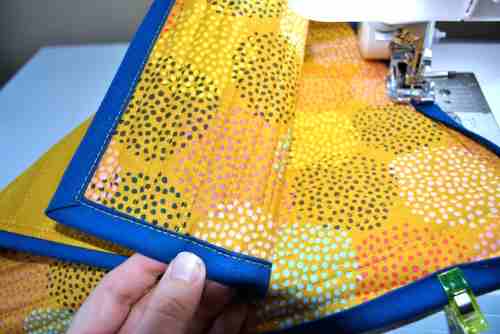
The next step is to take care to carefully insert your Placemat into the tiny opening that you made in step 4. Place your Placemat on its right side and outwards so that you have the pattern side facing the other side.
Create a tiny, tidy line all the way around. The result is an attractive, polished look.
To make the opening smaller – you can pull the fabric into (so that the frayed edge is facing the other way). Continue sewing it shut.
Take a look at this image (below left) to get a sense of what I am talking about. Hopefully.
Flatten the flats and enjoy!
You now have the perfect Placemat! A reversible placemat!
It is possible to take the iron in hot water and flatten it down flat. Do you see how simple that is?
Making these placemats was just 10 minutes (minus the ironing and cutting). However, that wasn’t too long, also!
This is an easy idea that’s great to make for the Holidays!
Want To Save Even More Time?
It was not my first choice. Instead of cutting two rectangles, take one piece, then fold the other half into half. So, you’ve got one side already closed.
The moment you flip your tablecloth upside down, it is still possible to make a beautiful stitch all around the Placemat, giving the appearance of a finished product.
DECORATION IDEAS
You can sew lace, ricrac, or even lace to the stitching. It can make your tablecloths into something distinctive and individual.