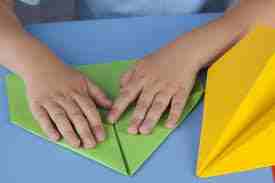
Fathers must pass down various skills to their kids: the art of riding a bicycle, avoiding stones, and, most importantly, making an airplane out of paper. If it’s the time to teach your children how to make a small sheet of paper to create an erupting jet, don’t get lost and make an airplane from your shaky memory of your childhood, one that is destined to take a disappointed plunge the moment it leaves your hands. Instead, let them learn how to create a plane to reach the sky.
Three designs have been tried and tested (you would be amazed by some of the research behind paper planes). They are great for beginners, intermediate, medium, and expert models. They are arranged starting with the easiest and ending with the hardest; therefore, there’s something to suit every grade of adults. Don’t pretend that you won’t try these in the breakroom.
Best Paper Airplane Design
Paper planes have been an essential part of our rainy days at home since my kids could walk. Ultimately, they’re easy crafts that are quick to build and do not require any additional materials or effort on my part.
However, I’ve learned that some adults (ahem…my husband, ahem…my babysitters) aren’t sure how to create these tiny precious gems. Crazy, right? You’re part of the people who have been deprived of their time and who are over 20 and haven’t folded a piece of paper into the form of an airplane within the past 15 years.
Materials to make your Best Paper Airplane Design
- Paper
- A tiny piece of tape
- Ruler
Step-by-Step Instructions for Easy Paper Airplanes
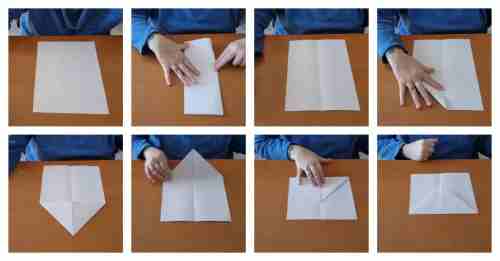
The most elegant paper plane design is assembled in less than a minute, making it easy enough to be used by anyone who is just starting. It’s not that difficult! In a few years, kids will fly a paper airplane like the Wright Brothers! The Wright brothers!
- Cut the paper in half along an even line.
- The top corner of the right-hand side should be folded into the middle of the page. The border should match the center border.
- Repeat Step 2 using the top left corner extending to the center of the fold. The top and bottom corners should be folded in this step.
- Increase the paper again, starting from the left side and ending at the middle crease, until the two points meet.
- Fold the corner on the left side to continue on the opposite side.
- Grab the plane and cut it in half along the central line. The edges that have been bent must be placed on the outside of the plan.
- Create a wing by folding one flap (the left side) towards the exterior.
Repeat with the left side to create the second wing.
I prefer to hold the plane with the help of a tiny strip of tape along the upper edge. Make sure that all the folds that were previously made are held!
It’s now time to take off!
The Dart (Intermediate) Paper Airplane
Step 1: With the sheet in front of you, with the shorter edge towards the bottom, fold it into longways (long like a hotdog or a long rectangle, depending upon the angle). Use your fingers to gently run through the folds to get it neat and secure.
Step 2: Remove the paper, fold it in half, and place it on the table.
Step 3. Fold the left side downwards until it meets the crease at the center you created, and then run your finger across it, squeezing it.
Step 4: Repeat the process for a right-hand corner, ensuring that every corner’s fold is aligned with the next.
The paper you are using should be creating an arch.
Step 5: Grab the whole arrow and fold it inwards towards the end of your page, just above the bottom of the arrow. Make sure to press the fold with your fingertips.
The paper you choose will look like an envelope and appear rectangular.
Step 6: Grab each of the upper left and right corners. Bend them in the direction of the middle fold, and then continue until they meet. This is the point where each side is required to be folded.
Step 7: firmly press down one at a time, holding the two points together.
Step 8: Cut the triangle with the highest point beneath where the last two points join and fold it to the highest point of the plane.
The lock will be secured by the folds from before.
Step 9: Flip the planar over and fold the plane in half. The fold will be reversed from the fold that was initially made. Press across the line.
The fold is done correctly if most prior folds are located on the outside.
Step 10: Grab the edge angle on the plane on one side and create the wing by rolling it toward the central fold.
The wing flap must extend beyond the fold at the center, but the decision is yours on the width of your wings. Just keep those folds in place.
Step 12: Turn the plane and fold it again on the opposite side of it to form another wing.
Check that your second wing is aligned in the same way as the first.
Step 13: Fold the wings until the upper part of your aircraft is level, allowing it to glide easily.
Making sure that the folds are the same on both sides (creating wings with the same shape) and making folds that are tightly folded can help your plane glide more smoothly.
The plane is more compact, faster, and less sluggish than the model similar to this Bulldog (easy) airplane mentioned above. This is the time to try the plane!
Practical Tips:
- Rubbing the creases using a ruler or a paper folder will make your folds appear more smooth and tidy.
- It is possible to fold the wings at different angles and widths. Build a plane using an elongated (or more significant) body, and then see what it is like!
- Utilizing any of our free airplane templates to design these planes out of paper is also possible!
What are the factors that affect the speed of paper planes?
The plane’s appearance is essential to the distance and how quickly it’ll fly. The glue tape that we’ve glued on the insides of the planes prevents them from bending during flight, which helps keep the speed and altitude.
If your airplane’s center of gravity is too far to the left, it’ll dive. Likewise, if it is too far backward, it’ll stop when it’s in the air. The clip of paper to your plane alters the center of mass.
Have fun throwing your paper plane out in the open while keeping the wind behind you to increase velocity and length. Acrobatic planes may do best if thrown in or in the air. Try out different combinations to determine what is most effective with your aircraft!