I frequently get questions about the accuracy of including bleed in the image or design within Photoshop. Both Illustrators and InDesign allow you to make a document with bleed marks, which can be used as reference points for the design of your project. Photoshop, however, lacks this attribute. While Photoshop has no specific bleed settings that can be applied to a file, it is still done with planning and forethought.
What Is Bleed For?
Bleed is the region of an image which is supposed to be cut once the photo is printed. Bleed is the area around the image once it’s printed on paper.
Bleed is a must for printing pictures since most printers can’t print up to the edge of the paper. And even if they do this, it could be risky because there’s a chance that you’ll lose a part of your photo if it isn’t sized correctly for the paper or your printer prints it slightly tilted. If you do not specify the extent of the bleed on your image, you’ll eventually have less control over the outcome of your image when it is printed.
Thus, incorporating bleed is crucial to determine your photograph’s appearance when printed. A proper amount of bleed allows your photo to fit onto the layout as desirable as possible while ensuring the appropriate quality and size and that you don’t have any random cropping after printing your image.
In that regard, It is important to note that most local and online printing establishments do not need bleeding to print. Instead, the image is automatically cropped to match the size of canvas or paper, which is the desired size for printing. The addition of bleed can stop your images from being cut off in these instances, but generally, it’s okay with the majority of printing options at present. The final decision is yours.
How to Add Bleed in Photoshop
Bleed can refer to the portion outside of documents or projects, which is cut following printing toto ensure that edges will have colour surrounding them.
Step 1: Add certain guides along the perimeter of your project to the document.
- Start the document you wish to bleed.
- Use the keys Ctrl + R to turn on rulers.
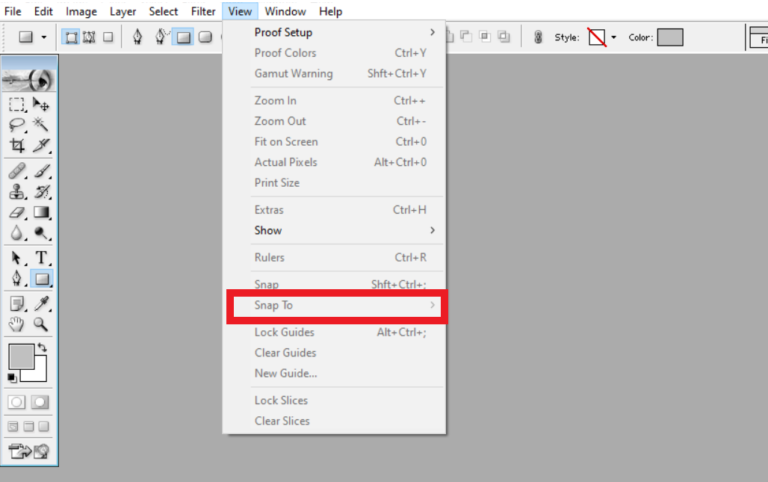
- Then, select the view opportunity.
- Select Snap To.
- Go to the Document Bounds to warrant that the guide you have downloaded adheres to the edges of the document.
- press the top ruler, then move a ruler down on the upper edge of the paper.
- After that, you can click on the left side of the ruler and drag a ruler to the left side of the document.
The same procedure is followed for adding the two extra guidelines to the paper’s other sides.
This guide will help you distinguish the printed section from the one which will be cut.
Step 2: Make the bleed with Photoshop.
- Click on Image.
- Select Canvas Size.
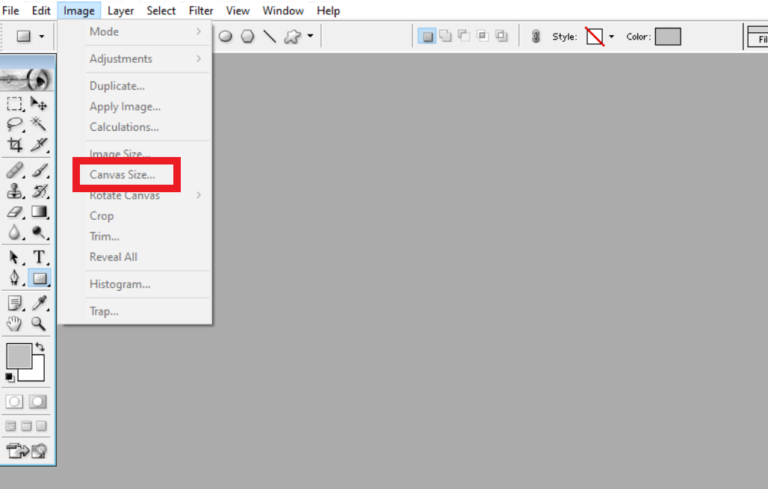
- Then, change the units for millimetres (mm).
- Within the Canvas size dialogue box, input the number of inches of bleed that you would like to include in the design.
For example, if you wish to increase 3 millimetres for every edge of your document, boost the size and width values by 6 millimetres.
- When you’re done, hit”OK”.
Choosing Your Canvas Size & Adding Bleed In Photoshop
Of course, the size of your canvas is important when setting your bleeding. To determine the size of your canvas, you’ll have to decide how big you’d like the image printed. Let’s take an example. I’m printing an image 24×18 inches after printing; the printers have trimmed the bleeding.
Open a new file using Photoshop through the “New” File button on the top page or by clicking File and then New.
It will open a New Document window will open.
In the upper right-hand corner side, you’ll have the feature to set the dimensions of your document to correspond to the size you’d like the Print you end up printing to be. You can specify the image size plus the bleed quantity you’d prefer. If you want to alter the measurement unit, select the drop-down menu, then choose the measurement unit you’d like to utilize.
You can select the Width and Height boxes and then enter the values corresponding to the dimensions of the image you’d like to be printed at and the quantity of bleeding. For example, I’d like my image to measure 24×18 inches and have the 0.5-inch cut-off, meaning that every edge will get the bleed to be 0.25 inches. In addition to the height and width regions, you can choose the orientation.
Click Create.
You can then upload the image to the canvas by adding it to the canvas using your File or going to File > Open and selecting the image you want to display within the document.
Sometimes, the image may appear in a brand-new Photoshop tab. Do not worry about it — go towards the Layers panel within the tab containing the image, click on the layer, and then transfer it onto the tab using your canvas until it is opened.
Drag the photo directly on the canvas or in the Layers panel. The image will be displayed on the canvas as a new layer in the Layers panel.
It’s possible that the image isn’t appropriate for the canvas. You can change it together with the Moving Tool (V).
Move and drag your image until it’s exactly how you’d like it to appear on your canvas. If you’re doing a lot of scaling to ensure your photo looks good on Canvas, change your layer’s format to an intelligent object.
The image is now in the size you want to print. You will also have a bleed area around the image.
How to Add Crop Marks in Photoshop
The crop marks are crucial to indicate where an image project needs to be cut. It is easy to add crop marks to Photoshop with these simple steps:
- Within your Photoshop, Click on the File opportunity.
- Click on Print.
- Then, choose Microsoft Print to PDF from the drop-down menu.
- Click on the Printing Marks section.
- Check for the Corner Crop Marks checkbox.
- From the function section In the Functions section, select Bleed feature.
- Set the Width units at 3.0 millimetres (mm).
- Click OK to apply the setting.
- Select Print to save your work in a PDF format.
Will the Edinburgh Copyshop add bleed to my document?
We can’t provide proper bleeds to the .pdf document after you’ve provided it to us, but there are two options for creating an edge-to-edge outcome, but both of them will require cutting into your artwork. It means you can remove areas you intended to make an integral part of your final art. For creating edge-to-edge printing with no bleeding, we could:
Then, boost the size of the document and trim it down to the size you want.
This choice preserves the final page size of the document by scaling all pages before trimming towards the edges of the layout.
Maintain the dimensions of the document. Trim to the size you want.
This choice pays off in a colour that is edge-to-edge; however, the Print that is produced will physically be smaller than what was intended. This reduces the amount of printed material lost due to trimming, but certain areas of the design may be removed.