As you become more acquainted with Twit, one of the words you’ll often encounter is,” For the unfamiliar, V.O.D. stands for Video on Demand and refers to the archive of live-streamed material. By setting the settings, you can allow automatic archiving on all your Twitch streams. They are accessible through the ine video Producer tab for download and additional editing. We’ll look at the steps to conserve Twitch V.O.D.s.
QUICK ANSWER
To save Twitch V.O.D.s, log on to the Twitch profile page and select your profile photo. Go to the creator dashboard > settings > Stream and switch the toggle to the opportunity to store broadcasts from previous broadcasts so that Twitch can regularly save your V.O.D.s.
How to preserve Streams on Twitch
The Twitch livestream disappears once the broadcast ends when the Stream is finished. Did you know you can save your streams in highlights and watch them whenever you like? Continue reading to find out the steps to do this.
- Log into Twitch and click on your profile in the top right-hand corner.
- Select Creator dashboard.
- Choose Settings in the left menu and then select Stream.
- Tap down to switch the toggle to the storage of broadcasts from previous seasons under V.O.D. options.
- Similar to that, switch the switch on to Always Publish V.O.D.s.
- Scroll down until you can flip the switch onto the Clips settings to be enabled.
- The toggle should be turned on to enable “Feature This Clip Settings” in the “Feature Clips” section.
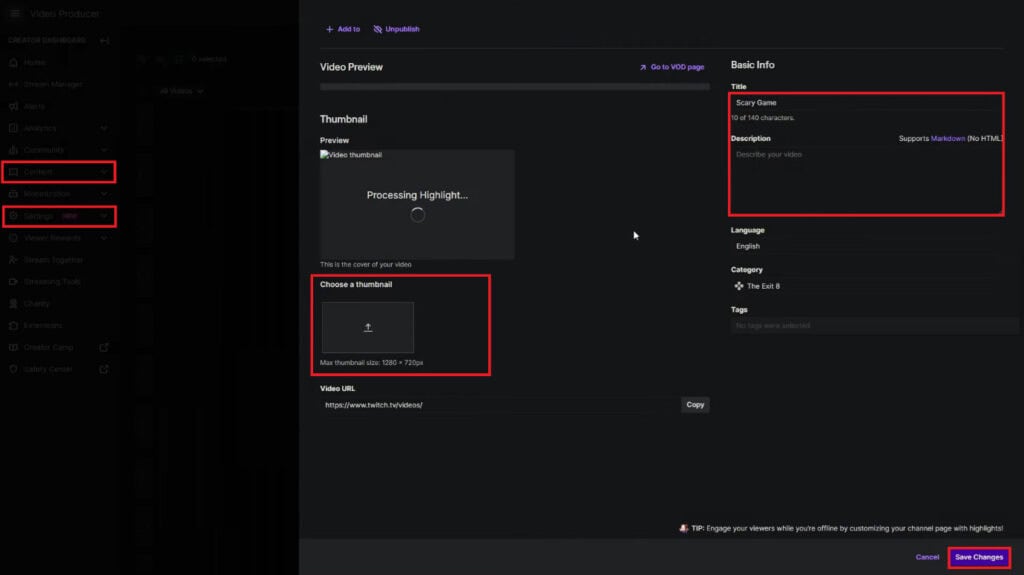
- Click on the information in the left menu.
- Select Video Producer.
- Select the three dots beside the video you want to watch.
- Select Highlight.
- Slide the slider until you select one specific portion of the video you want to save.
- Select Publish Highlights in the upper left side of the window.
- Click on the arrow icon in the middle of Select a thumbnail image to upload a photo.
- Select the Title and Description box, then enter your Stream’s name.
- Click on Conserve Changes.
How do you preserve streams from Twitch together? Highlights and V.O.D.s
There are several methods for keeping Twitch streams when they’ve stopped. However, you’ll need to allow them to be saved before the Stream begins.
V.O.D.s (videos on Demand) are just videos of streams, including all chat conversations. If you’re a Twitch Partner, Amazon Prime subscriber, and a Twitch Turbo subscriber, you can keep V.O.D.s available to your Twitch channel for up to 60 days. Everyone else has the choice of keeping them online for 14 days. When the timer expires, Twitch deletes the V.O.D.s.
If you have streams you wish to maintain for the duration of your channel, make them Highlights. The same thing happens to V.O.D.s, but they do not expire.
If you save your old broadcasts elsewhere other than on your public Twitch channel, you can download the Highlights or V.O.D.s to your personal computer. This can be useful if you wish to publish your streams to YouTube such as YouTube.
Learn how to allow V.O.D.s to convert every V.O.D. into a highlight and save the streams to your P.C.
What can creators do to be able to save Twitch V.O.D.s?
We want to save time acquiring those additional Twitch V.O.D. views! Twitch creators can archive their previous broadcasts within the Stream Settings section of the Twitch Creator Dashboard.
- Visit the Creator Dashboard.
- Open to the Settings tab.
- Select the Stream menu option.
- Within V.O.D. Settings, turn on “Store past broadcasts” to the off position to enable archived broadcasts.
- After you’ve enabled broadcast archived, all your broadcasts will be released as V.O.D.s automatically. This setting can be turned off by turning off the “Always Publish V.O.D.s” opportunity. Selecting specific streams that will be unpublished automatically under the “Exclude categories” section of the V.O.D. Settings page is also possible.
The videos in the past broadcasts section are available for unpublishing anytime.
Downloading and Exporting Streams to YouTube
Another option to shield your streams from the dust of time (and Twitch’s automatic suppression) is to transfer them to a downloader or YouTube. This is particularly useful if you’re beginning your streaming career and want viewers to discover your Stream on different platforms and quickly grasp its quality.
If you’ve learned the accurate way to save streams from Twitch, now is the time to find out how to download streams.
On the video producer, Check for the highlight or other streams you want to download or Export. Select the three dots, then choose “Download” from the menu drop-down. It will then change to “Preparing …” and take a few minutes until Twitch opens the download. When the processing has been completed, accessing the streaming at the original resolution will be possible.
There is another option using YouTube export. On the same menu, choose Export. The next screen will prompt you to select the video’s name and description and whether the video should be posted on YouTube. You can, of course, create the video later. The system will ask you to join if you’ve not yet joined your Twitch accounts.
Click on Start Export. Twitch will notify you via email once it’s finished creating the video.
How can I export the Stream before removing it from My Twitch Channel?
This is how to download and export a streamed video that you downloaded from Twitch.
- Take steps 1-10 in the previous section, How to reduce streams on Twitch.
- Select Export in the drop-down menu.
- Click Export in the prompt for confirmation.
It is now possible to archive any live stream you receive from Twitch to your device.
Why Can’t I Conserve My Videos on Twitch?
Twitch only allows users to access the settings to show their previous streams on the app’s desktop version. If you cannot locate the options, you are likely registered on Twitch through the mobile application.
How Long Are Saved Streams Available on Twitch?
If you don’t highlight your streams for regular users, your saved streams are accessible for 14 days. Twitch Partners and Prime users have 60 days of archives.
F.A.Q.s
What is a V.O.D. on Twitch?
V.O.D.s are recorded versions of previous streams. V.O.D. is a short form for video on Demand.
What is the accurate way to watch V.O.D. via Twitch?
To view the streamer’s V.O.D., you must visit the streamer’s profile page (i.e., channel) on Twitch—several tabs beneath the playback zone, such as About, Home Schedule, Videos, and Schedule. Select Videos to view their partners’ V.O.D.s.
Do you receive a fee for V.O.D.s you stream on Twitch?
The views you see on V.O.D.s don’t affect the revenue you earn through Twitch.